How to successfully connect a car LED light bar?
.jpg)
Products related to this item
.jpg "Image of DARK OFF-ROAD LED BAR - 20cm to 100cm - Combination")
4900 lumens48 Watts
20cm to 100cm - Lighting type: COMBO (Priority Wide 75° +Far 40°)
.jpg "Image of LED Bar Beam Deutsch 2 Pins + Remote Control - Premium")
12-24V30 amperes
Button/relay harness with remote control ideal for LED bar and additional headlight...
.jpg "Image of PACK 2 LED BAR ROOF RACK SUPPORTS")
Universal support LED ramp for car with roof rack
.jpg "Image of PACK 2 XS MOUNTS FOR LED BAR, TUBE MOUNTING")
Diameter of your choice: from Ø29 to Ø77mm
XS support compact size
This pack is sold with: 2 XS ...
.jpg "Image of VXT 53CM LED BAR CODE/HEADLIGHT + FLASH")
9000 lumens120 Watts
Length: 53 cm - Lighting type: CODE/HEADLIGHT + ORANGE FLASH
Revolutionary LED bar equipped wi...
.jpg "Image of LED Bar Beam + High Beam Control (H4 Connector)")
12-14V30 amperes
Button harness / Waterproof fuse + H4 connector allows you to easily power your LED bar or addi...
.jpg "Image of LED RACE MAX BAR + Touch Function - 30 to 131 CM")
6000 lumens60 Watts
30 to 131 cm - Lighting type: COMBO (Wide 55° + Far 20°)
.jpg "Image of LED RALLYE DARK 68CM BAR PACK + 2 20CM CORNER LIGHTS")
18600 lumens192 Watts
Discover our Rallye 68 cm Combo LED bar pack: long range + exterior Flood, accompanied by 2 LED...
.jpg "Image of RALLYE DARK LED BAR - 20cm to 100cm - Combo, Spot or Flood")
18600 lumens192 Watts
20 cm to 100 cm - Type of lighting of your choice: COMBO, FLOOD OR SPOT
Ideal for obtaining super powerful lighting, the LED bar is a top accessory. Installed on the roof or on the bumper of your vehicle, it allows you to see very far. This is especially useful off-road, particularly when driving at night. How do you successfully wire a car LED light bar? Explanations.
Determine the location of your car LED light bar
An excellent alternative to original headlights, the LED bar is a very powerful lighting system. To ensure your installation project is successful, it is important to take a few preliminary steps.
If you want to purchase a car LED light bar, it is essential to know where to install it. Several options are available: installation on the roof, on the grille, or even at the rear of the vehicle to benefit from a super powerful reverse light. If you choose the first solution, you will benefit from a wide and diffuse light. Installing it on the roof of the vehicle offers long-range lighting and much better light projection, especially on each side of the vehicle. Depending on the location of the LED bar on the roof, you can enjoy the light directly from your driver's side window, or even from the rear seats if it is located at the back of the vehicle.
Installed on your grille, a LED bar also provides excellent lighting. This position is very suitable for rough terrain, as it allows you to perfectly see the slightest deformation of the road and have intense and very focused lighting, right from the base of the front bumper. However, the illuminated distance is shorter than on the roof.
Which bar to choose for your car?
Depending on how you want to use your car LED light bar, you can choose the appropriate type of lighting. In addition, the LED bar should be chosen according to these characteristics: luminous intensity, beam shape, and its dimensions. For optimal lighting, opt for extremely powerful 2-row LED bars. For a roof installation, the most popular sizes are 50 cm (often installed in pairs with an integrated white or orange position light for a more eye-catching look), 80 cm, 1 meter, and 1.3 meters for trucks.
For a grille or front bumper installation, a slim 1-row LED bar will be perfectly suited. Thinner, it allows for easy integration and an aesthetically pleasing result. The recommended sizes are 20 cm, 30 cm, or 50 cm.
Very practical, "Combination" type LED bars allow you to have both wide and long-range lighting, making them an excellent choice. In addition to its extremely powerful lighting, this accessory has the advantage of being the perfect mix between a "spot" type bar (long-range lighting only) and a "flood" type bar (wide lighting, but with shorter range). The most popular LED bars for road use are those with a "Driving" beam, as the light concentration is much stronger over a long range than a LED bar with a standard beam. Indeed, the latter loses its effectiveness at long distance. Once you have acquired the LED bar that suits you, you can proceed with the installation.
Installation and wiring of the LED bar
To begin, you need to mount your car LED light bar.
Several mounting systems are available:
- 1st simple method: It consists of using the brackets provided with your LED bar. Generally, there are 2 side brackets and sometimes, as with many AGM Vision LED bars in our range, central brackets which are practical for mounting in small spaces or for aesthetic reasons.
- The "round" mounting brackets are very suitable for 4x4 grilles with bull bars made of round tubes, as well as round roof bars or roll bars from Rhino or other brands mounted on pickups. We have mounting brackets for round tubes ranging from 20 to 80 mm in diameter.
- The "square" brackets are perfect for attaching to a square or rectangular roof rack or roof bar, for example.
- The so-called "vehicle-specific" brackets are clearly dedicated brackets for your vehicle, such as our Ford Ranger roof bar brackets or Jeep Wrangler brackets. These allow for better integration.
How to wire your LED bar simply with a control button?
Before any electrical connection, it is essential to disconnect your car battery. To do this, simply remove the negative terminal from the battery. This will prevent any risk of electrocution or damage to your LEDs.
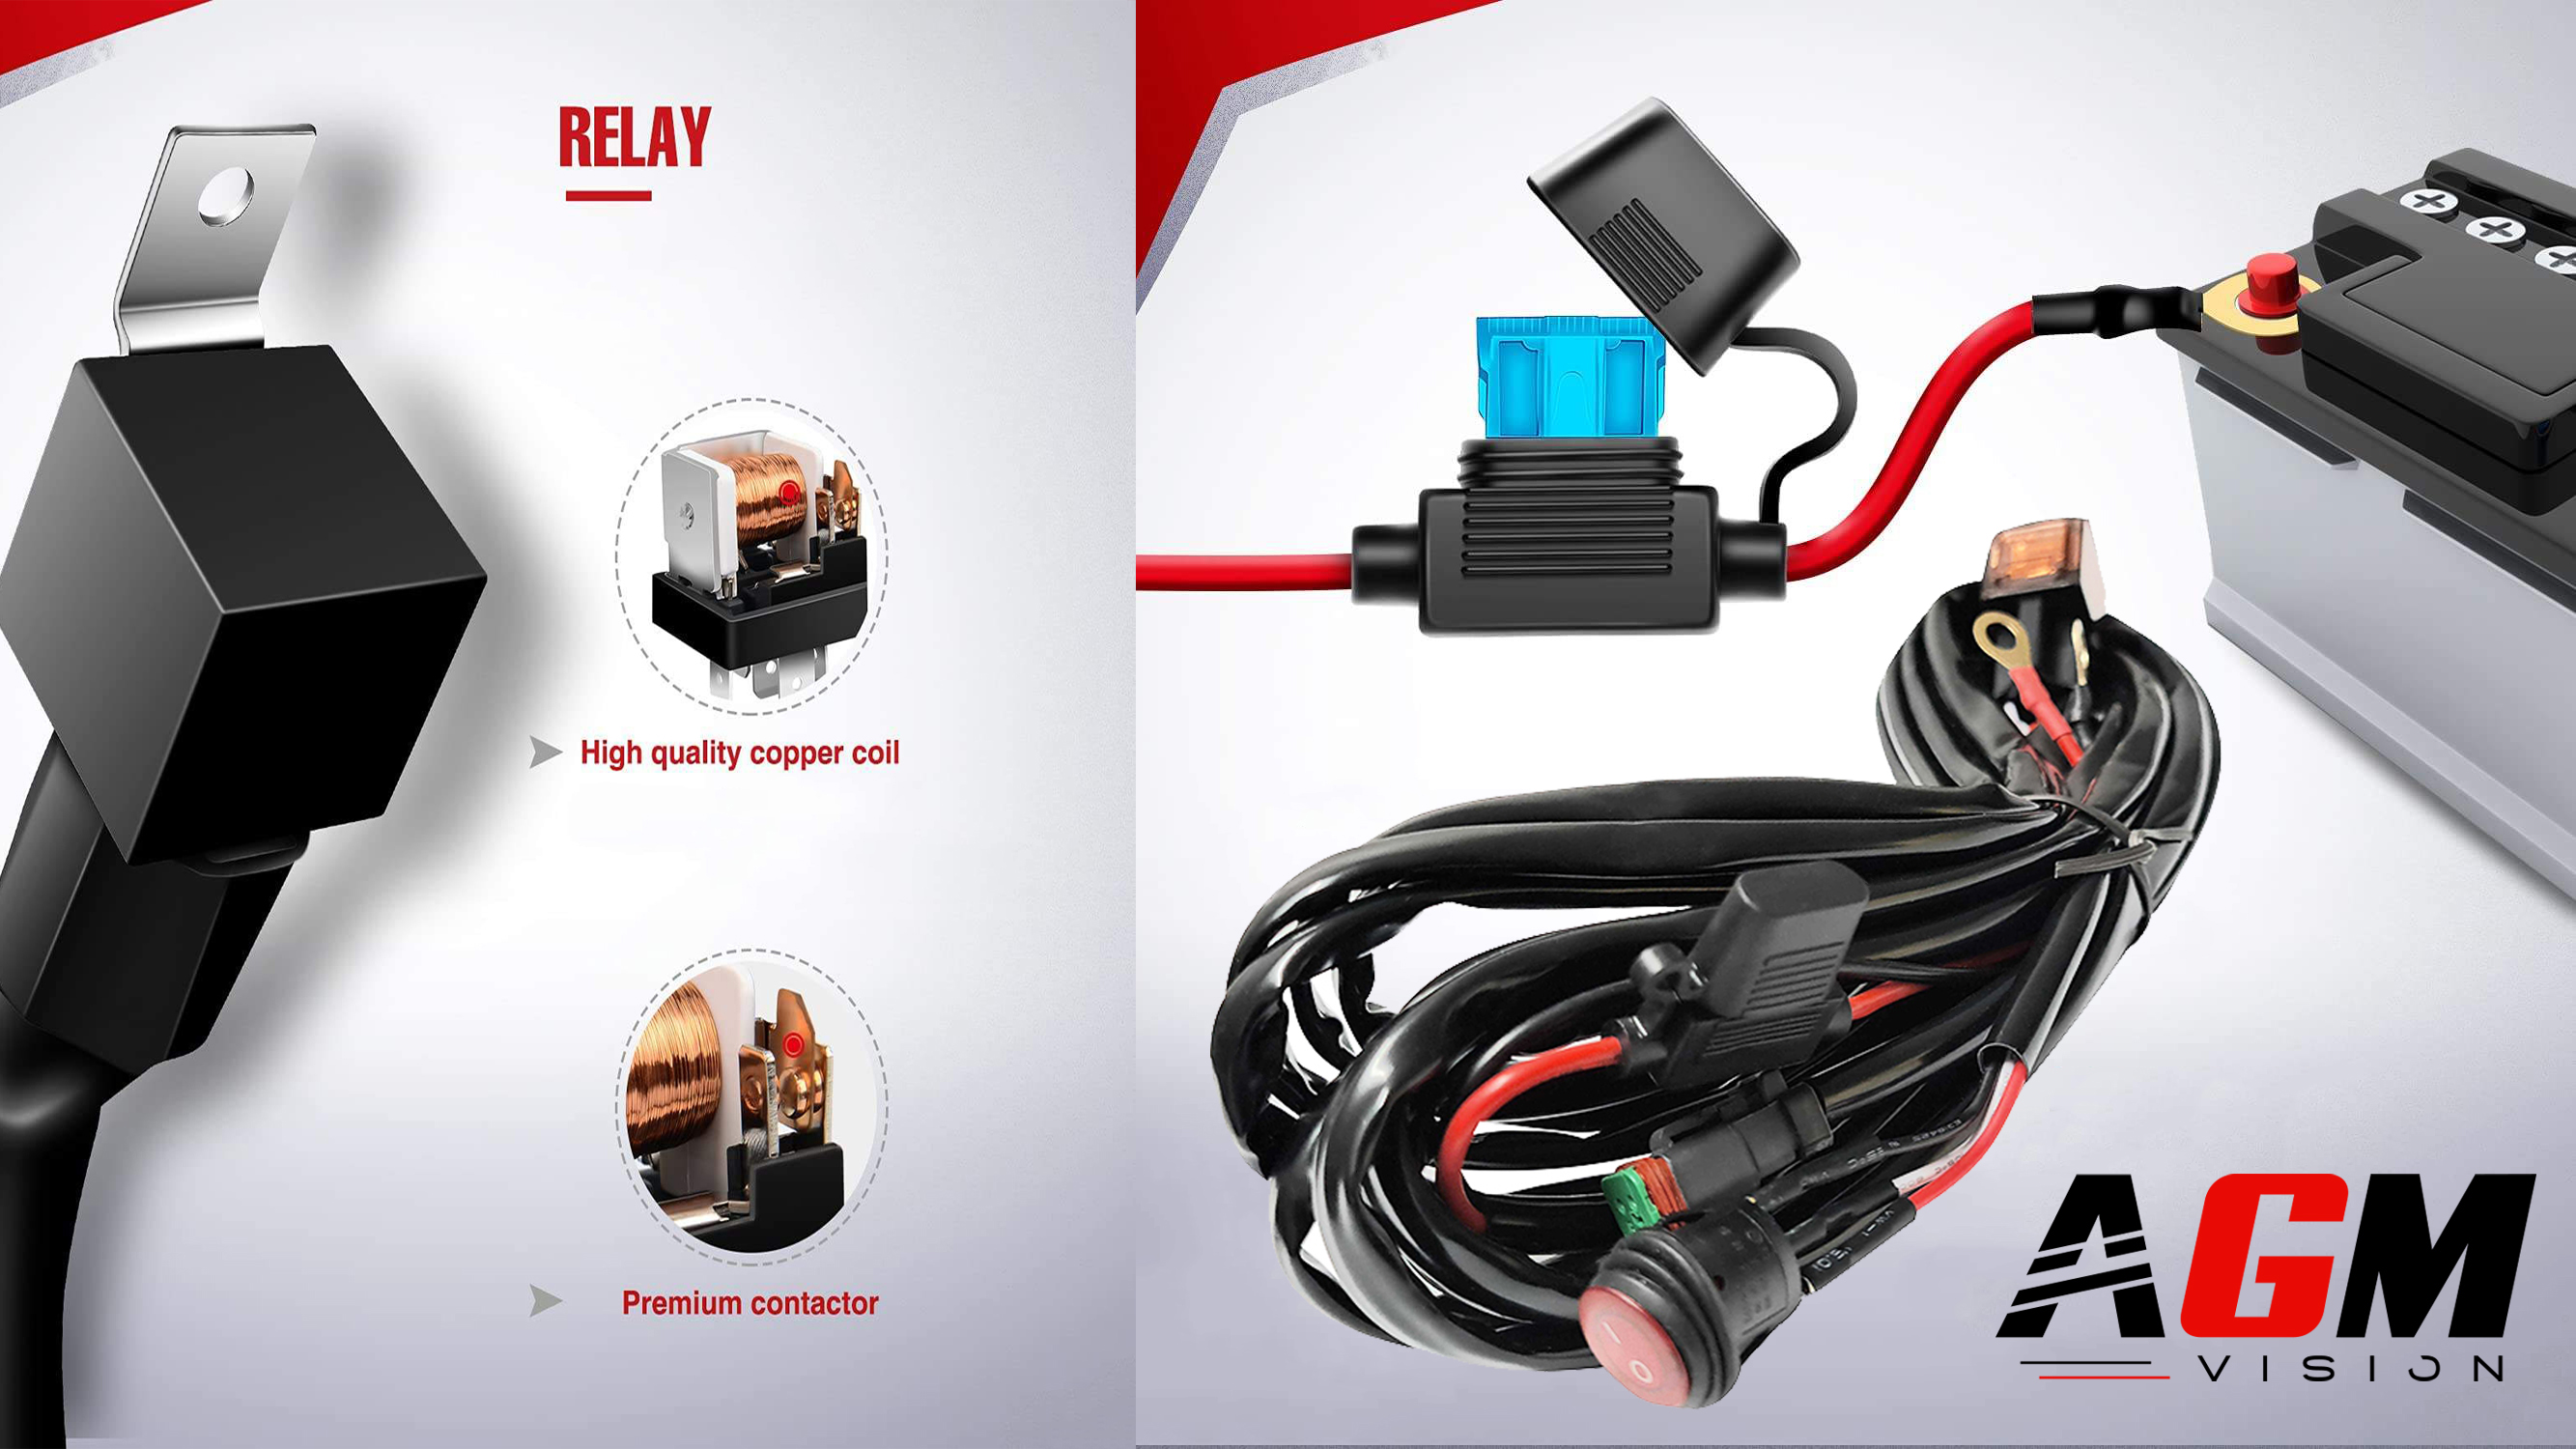
For a lighting mode with activation of the LED bar using a control button, you need to have a quality wiring kit. Composed of at least a relay, a fuse, and a button, it will allow for a reliable installation, without risk of wire overheating or risk of fire due to an unfortunate short circuit on the LED bar wiring. Good to know, before purchasing your wiring kit, there are two main models: so-called "low and medium power" wiring kits and so-called "high power" wiring kits.
We offer different types of high-quality AGM Vision wiring harnesses depending on the power of your LED bar. They are perfectly waterproof, equipped with a Deutsch connector output or two outputs for installing two LED bars, for example. The best-selling wiring harnesses are: the Premium LED Bar Harness 1 Output & Deutsch 2 Pins for high power capable of handling up to 250 real Watts and more than 600 Watts peak, or our very high power LED Bar Harness 1 Output & Deutsch 2 Pins with its thick wires. This harness can be combined with the most powerful LED bars available, up to 500 real Watts and more than 1000 Watts peak.
Once these steps are taken, start by installing the bar switch in an easily accessible location in the cabin and near the driver. Preferably, run the control button wiring through an existing passage in the vehicle. If necessary, do not hesitate to make a hole to pass it through. Be sure to add a rubber grommet or make a silicone seal to maintain optimal waterproofing between the outside and the cabin.
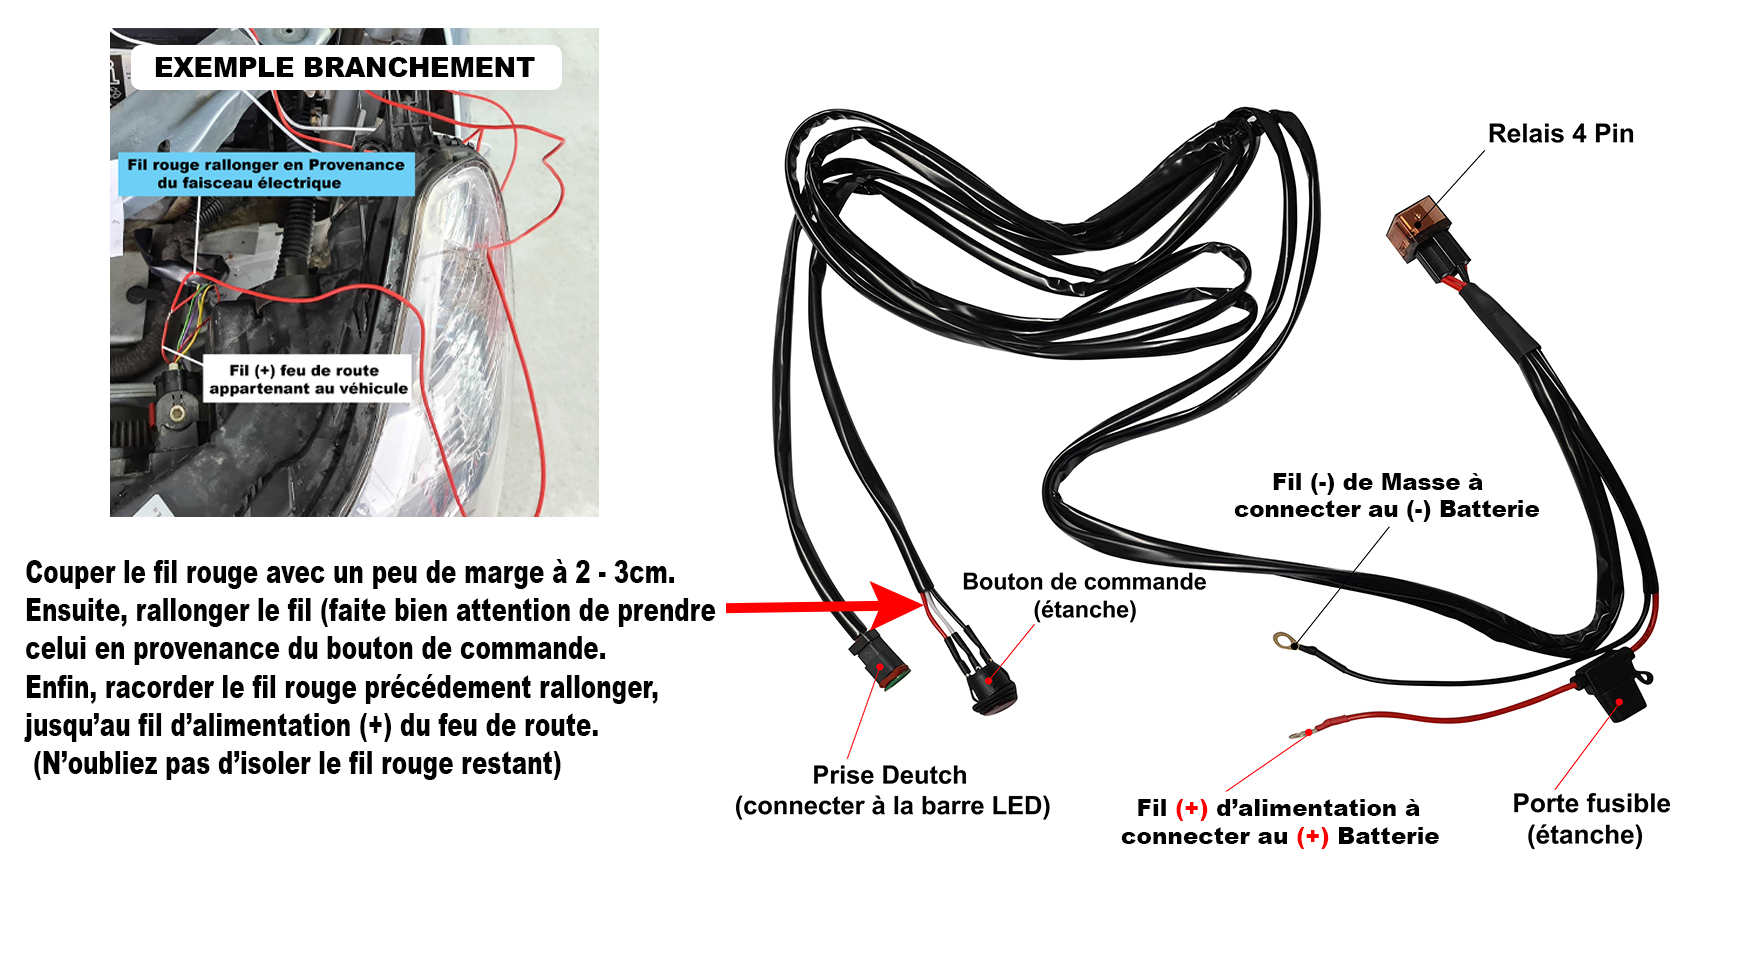
Connect your LED bar with the wiring kit. If it is premium quality, the connection will be made with a Deutsch (waterproof) connector. If it is a budget wiring, it will simply be done with two + and – wires that will need to be soldered or crimped. Finally, route the wiring harness so that it is as inconspicuous as possible. Secure it well with small black plastic ties so it does not move.
Last step of the wiring, connect the two main power wires. These two wires are easily recognizable, as they are often of larger diameter. Connect the red + wire directly to the positive terminal of the vehicle battery, you will notice that this wire has a fuse holder, located a short distance from the battery. The closer it is to your battery, the safer your installation will be!
Finally, all that remains is to connect the last wire (-): the black ground wire to the negative terminal of the battery or to a metal point in the engine compartment. Make sure this ground point is clean to ensure optimal electrical connection. Only after this phase can you reconnect your battery. Now, you just have to enjoy the lighting of your car LED light bar.
Below is a simplified wiring diagram for the LED bar installation.

How to wire your LED bar with the high beams of your 4x4 or car?
In this article, we will present different methods to wire your LED bar or LED light bar on your vehicle. We will particularly show you the most requested method: how to make your LED bar turn on automatically when you activate your high beams, also called your "main beams".
- The simplest solution to obtain this functionality is to purchase one of our LED bar wiring harnesses with simplified high beam control, equipped with male/female plug&play connectors. They are very easy to connect and are available with different types of connectors depending on the socket you need for your vehicle, such as the H7, the H1 or the H4, which is the most common on 4x4s. Thanks to this type of plug&play harness, you will no longer need technical skills or to look for the high beam signal wire. No more headaches for wiring your LED bar with the high beams!
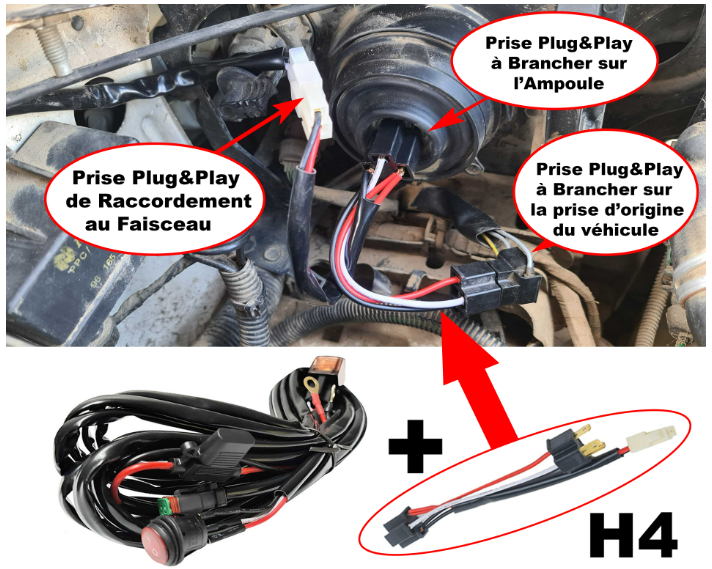
- Another more technical solution, but which works just as well as the previous one, consists of directly searching for the control wire among all the wires that make up the main headlight socket, using a multimeter or a test lamp to detect the high beam signal wire. The method is simple to find this wire: just activate the vehicle's high beams and test each wire with the test lamp or multimeter. If you use a test lamp, just see if it lights up, or with a multimeter, if it shows a voltage above 12 volts. Once the power wire for your high beams is located, mark it and keep it in reserve, as this is the one you will need to connect without cutting it to the wiring harness of your LED bar, as shown in the attached photo below. Note, with the wiring mode we show in the photo, the button must be ON, otherwise the automatic mode will not work.
At AGM Vision, as a rule, most of our wiring harnesses for Quad LED Bars, 4x4, truck, and car come with instructions in French to help you with the wiring, along with a few tips to have your LED bar turn on at the same time as your high beams.
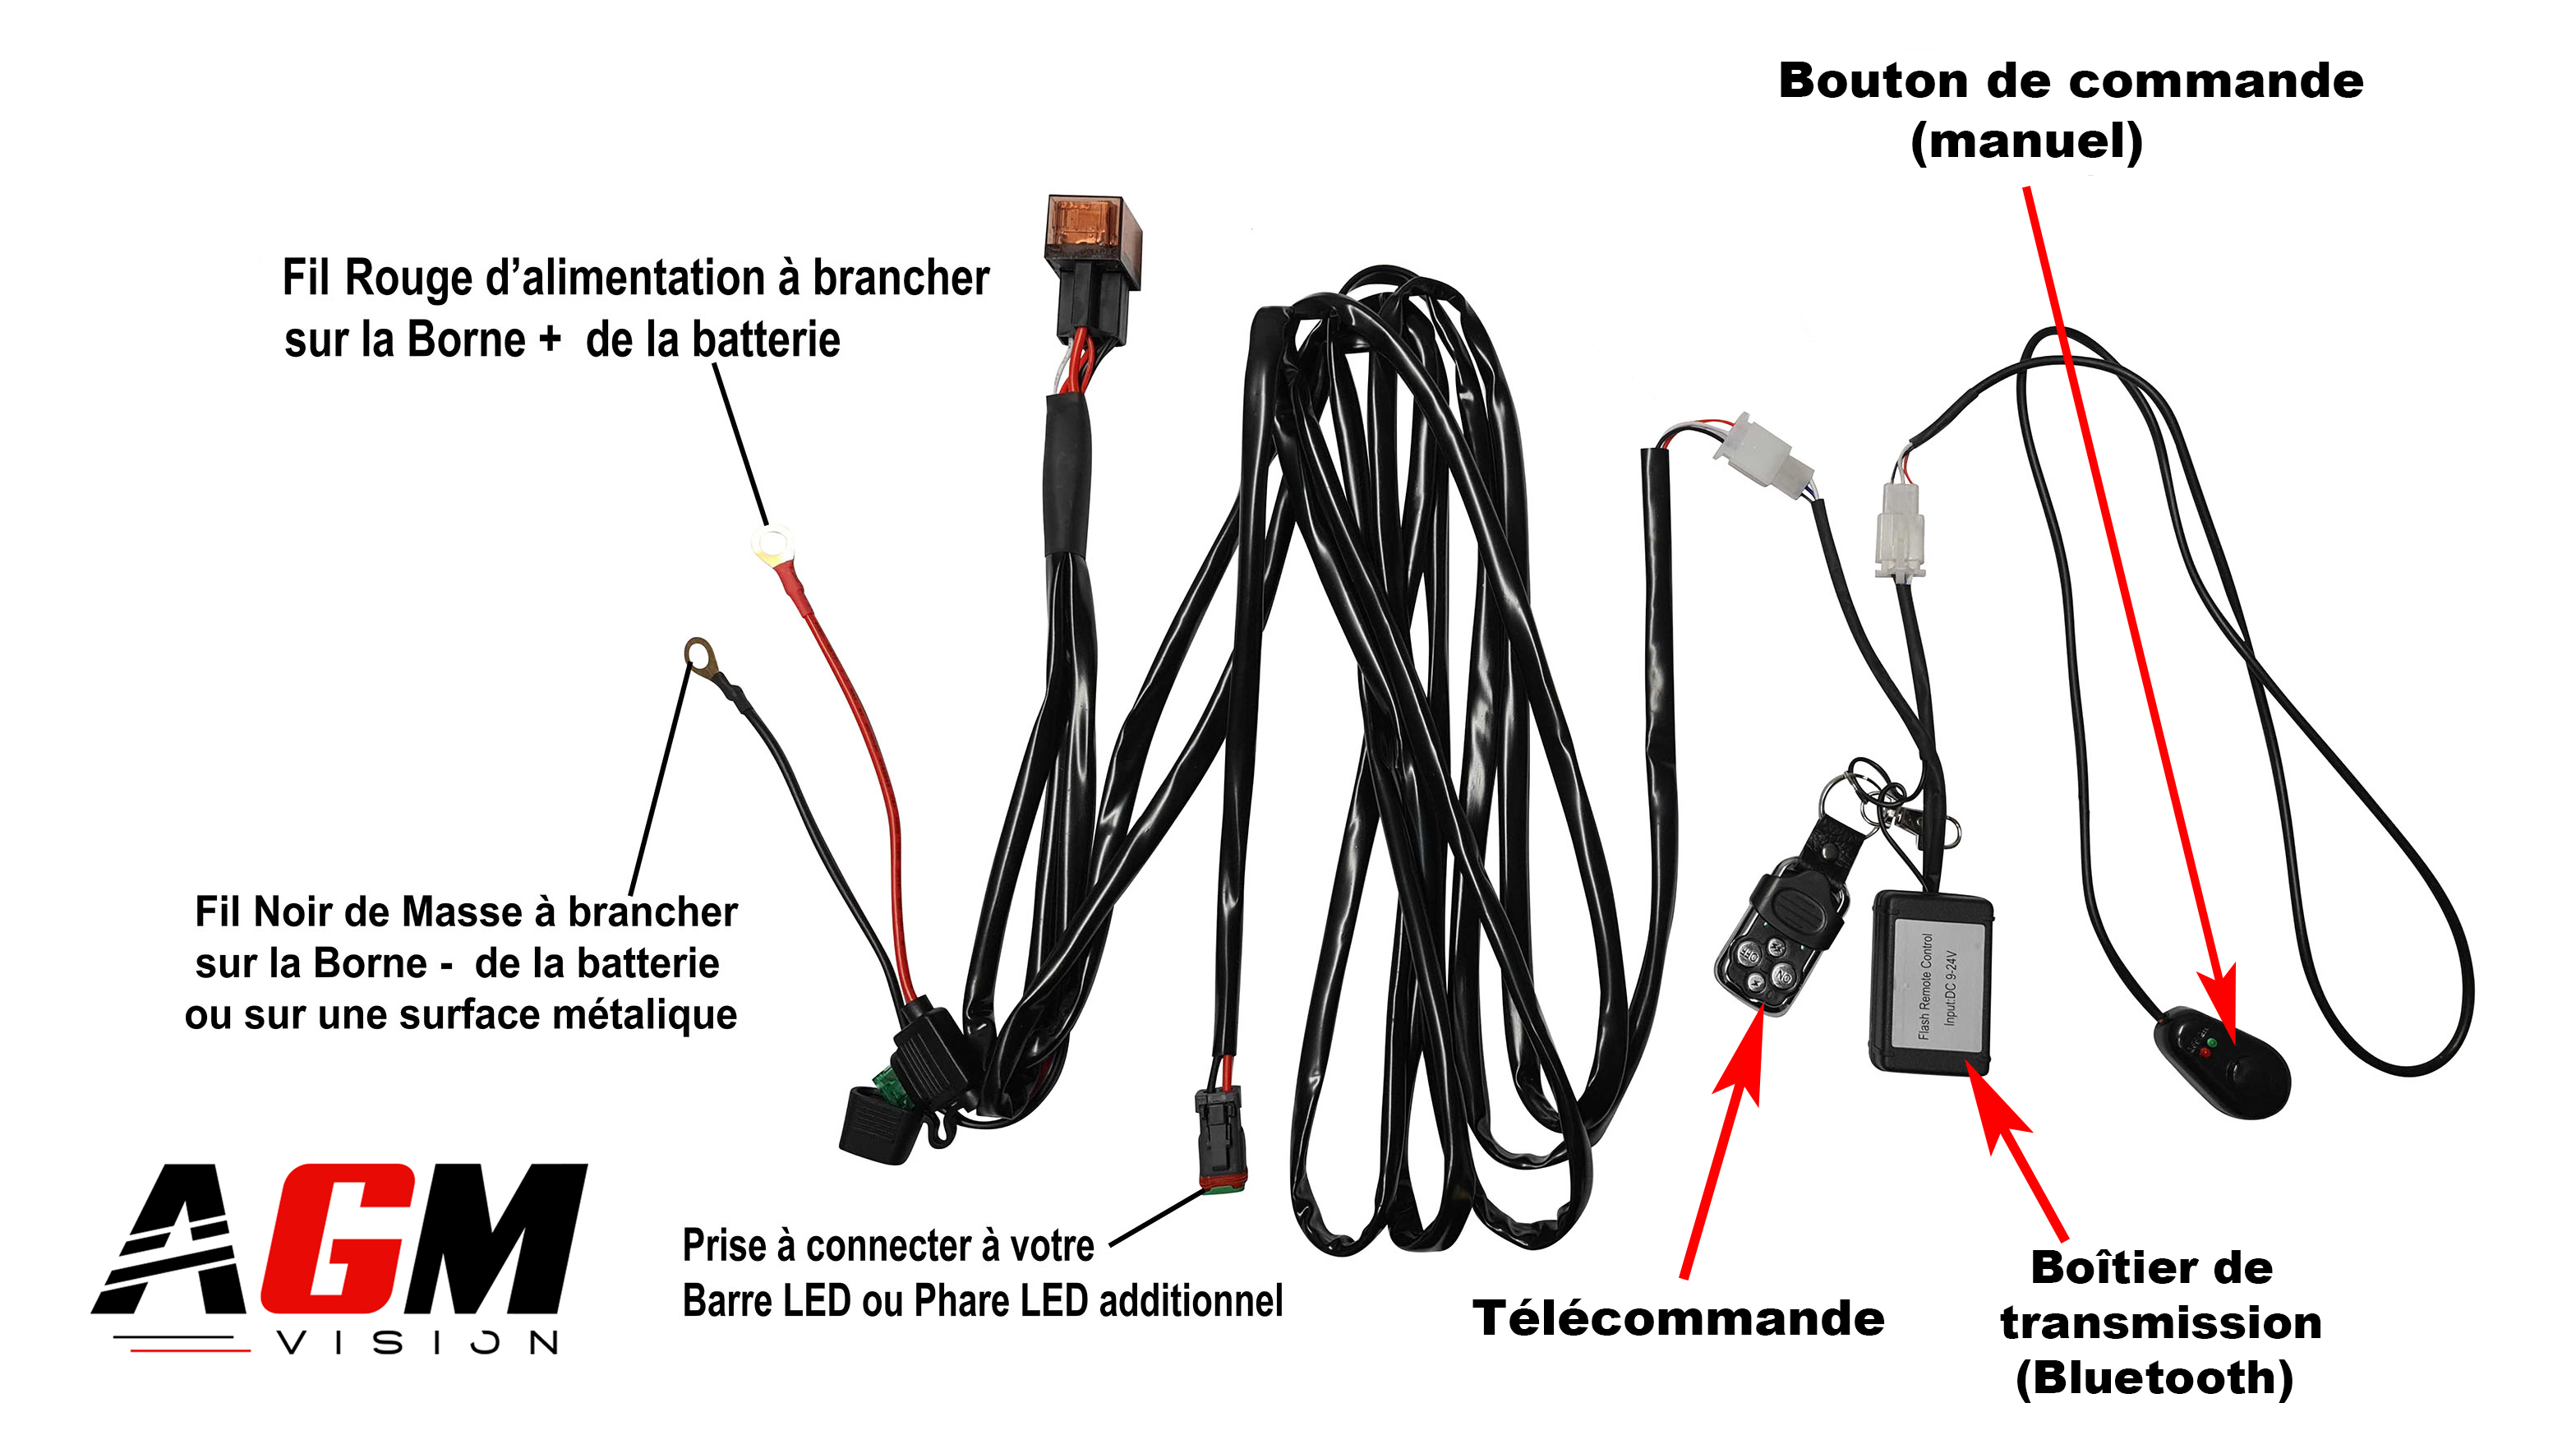
How to remotely control your LED bar or LED headlight?
This question comes up often: how to activate a LED bar remotely with a remote control? To do this, simply purchase one of our wiring harnesses for LED bar with Bluetooth remote control. Note that installation on your vehicle is very simple, especially thanks to its Plug & Play connectors. The Bluetooth technology in this wiring harness allows for remote control of your LED light bar. With this type of harness installed, you will be able to turn your LED bar on or off via the On and Off buttons on your remote control, as needed.
In addition, this wiring harness for LED bar with remote control also offers other lighting modes accessible via the Bluetooth remote. Among the available options, you will even find the possibility to enjoy strobe light functions with several timings, ranging from very slow to extremely fast. Moreover, an SOS strobe function is included and can be very useful in certain situations.
Discover the wiring harnesses for LED bars that you might like:
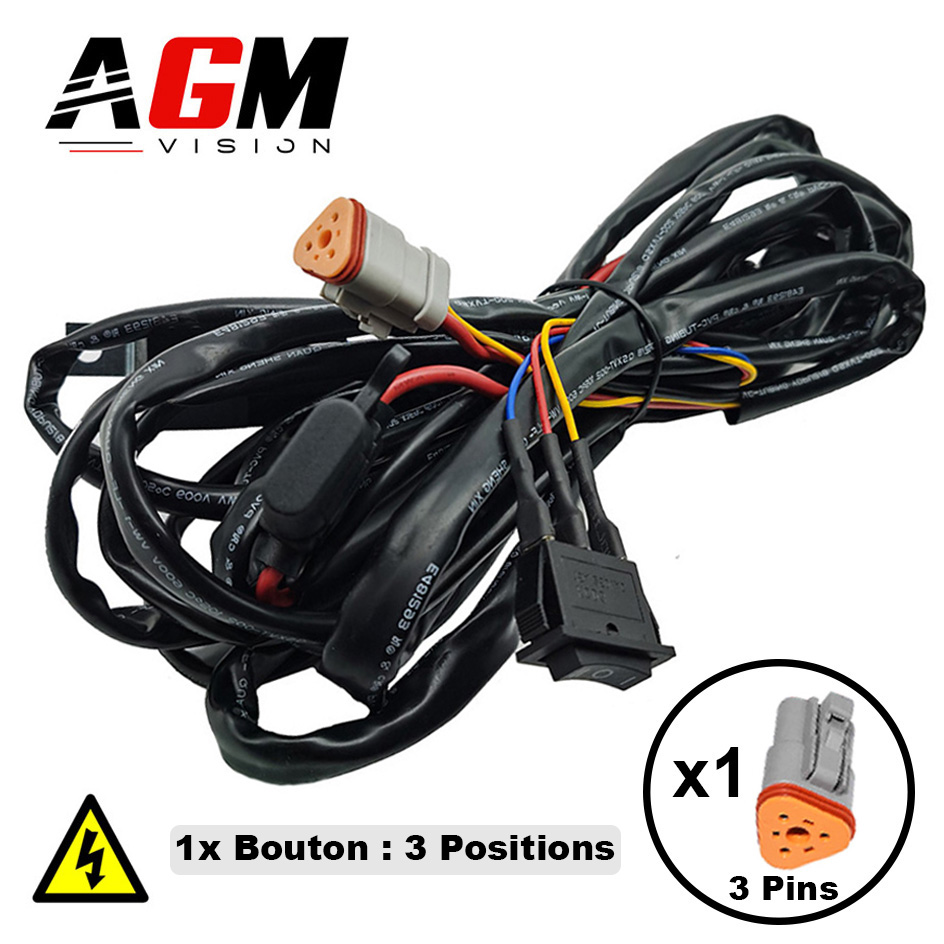
- The 3-pin wiring harnesses for LED bar are very practical and are the most used today. This type of wiring harness has a single button with three positions, it allows you to turn on the position light that is integrated into most current LED bars in position 1, in position 2 it allows you to activate the full power of the LED bar, and finally in position 0 Off to turn off the LED bar.
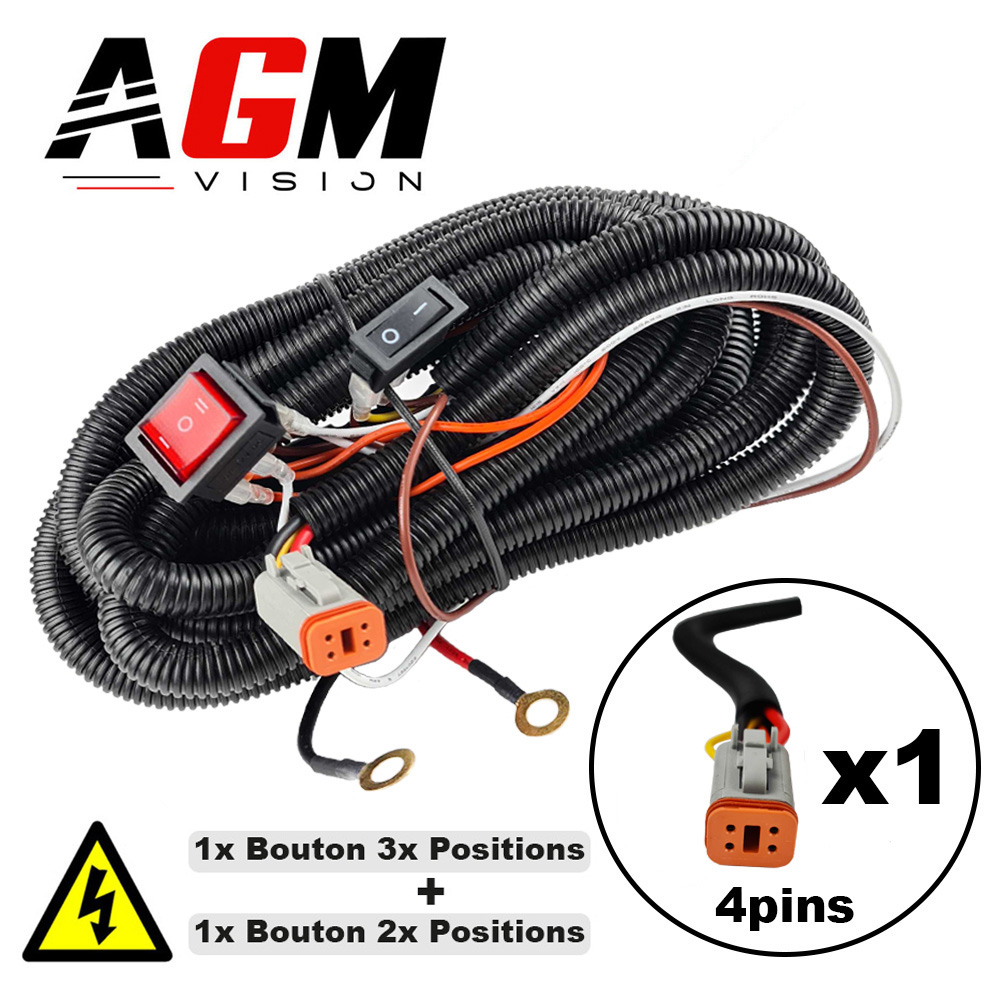
- The 4-pin wiring harnesses for LED bar or LED light bar equipped with two buttons, this type of harness is highly sought after because it allows you to control several functions with a single wiring harness. It gives you the possibility, for example, to control with the first button, which has three positions, the white and orange position light function and off. Nowadays, many LED bars integrate position lights. The other double-position button allows you to control the high power part of the LED bar and to turn it off in position 0.
- This 4-pin wiring harness can also be used for approved LED bars that have the power reduction function or for LED bars with low and high beam function, or even the possibility to control several colors when your LED bar has several lighting colors, such as the All Weathers LED bars that allow you to drive in all weather conditions thanks to their real-time changeable color: white & yellow or white & orange.
- Many other wiring harnesses for LED bars exist and are available in our section dedicated to this type of equipment.
As you can see, installing a car LED light bar is not as simple as it seems. If you do not have the necessary skills to do it, we recommend seeking the help of a professional.